Encaustic medium, often simply referred to as wax, is a combination of beeswax and damar resin. When pigment is added to encaustic medium, we then have encaustic paint.
encaustic medium = beeswax + damar resin
encaustic paint = beeswax + damar resin + pigment
BEESWAX
Beeswax is naturally white when secreted by bees but gradually turns yellow when it gets exposed to pollen, propolis (bee glue), and dirt. To return it to its natural color, manufacturers bleach the beeswax, either mechanically or chemically. Mechanical bleaching uses a natural filtering method to remove the color from beeswax. This is the ideal method for beeswax used in encaustic. Chemical bleaching, as the name implies, uses chemicals to mask the color. Definitely not suitable for artists because the color can later return. It also changes the composition of the beeswax, making it more reactive to pigments and pollutants.
DAMAR RESIN
Damar resin, extracted from a family of tropical trees in India and South East Asia, is added to beeswax for the following reasons:
- It raises the melting point of beeswax.
- It adds a nice shine and transluscency to beeswax.
- It prevents bloom, a white film that can occur on the surface.
- It allows the wax to cure and harden over time.
Note: Don’t confuse damar resin with damar varnish found in art supply stores. Damar varnish is actually damar resin dissolved in turpentine. Although it has been used before to make encaustic medium, it is not recommended because damar varnish is highly toxic. And since it has turpentine, it changes the consistency of the medium, making it thinner.
MAKING YOUR OWN ENCAUSTIC MEDIUM
One of the joys of encaustic for me is making my own medium and paints. Whenever I’m preparing a batch of medium, I feel like an alchemist in the middle ages transforming ordinary ingredients into something precious. And that subtle, sweet aroma of beeswax is just delightful to the senses. I like to work with a wax-to-resin ratio of 8:1 (8 parts beeswax to 1 part damar resin, measured by weight). If you want a glossier and harder medium, you can increase the amount of damar resin in your mixture. A popular blend with a higher percentage of resin is 1 part resin for every 4.5 parts beeswax. Just beware that using too much resin in your mixture may cause your art to become too brittle. Alternatively, not having enough damar resin in your mixture will have negligible effect on your wax. If you want to experiment, I suggest working within the wax-to-resin ratio range of 4:1 and 10:1.
The following recipe is what I used in the video below and will make enough medium to fit a 6-cup muffin pan. Cooking time is about 30 minutes.
Ingredients:
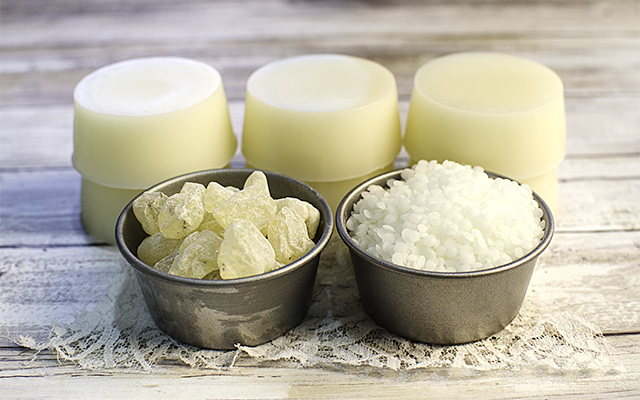
16 oz white beeswax (mechanically-filtered)
2 oz damar resin
Tools and Equipments:
electric skillet
clip-on dial thermometer
wooden spoon or paint stirrer
heated palette or electric griddle
pot for filtering
muslin, old cotton shirt, or any tight-weave fabric (enough to cover the pot for filtering)
4 small binder clips
ladle
silicone muffin pan or mini brownie mold
Instructions:
1. Attach the thermometer to the electric skillet.
2. Put half of the beeswax in the skillet ans spread it around to cover the bottom. Set the temperature to 160°F and let the beeswax slowly melt.
3. When the beeswax has melted, add the damar resin and spread it out using a wooden spoon or paint stirrer.
4. Increase the temperature to 180°F. The resin will slowly melt into a thick, gummy consistency. Use the paint stirrer to occasionally lift any resin that sticks to the bottom and to mix the wax and resin together.
5. Once the resin is dissolved, add the rest of the beeswax.
6. While waiting for the wax to melt, prepare the pot for filtering by keeping it warm on the griddle set at 180-200°F.
7. When the wax and resin have completely melted, give the mixture a good stir.
8. Now it is time to filter the medium to remove any debris that came with the damar resin. Use a piece of muslin large enough to cover the pot. Place it on top of the pot, creating a recess so the wax can pool on top while it is being filtered. Use small binder clips to secure the paper towel to the pot.
9. Transfer the medium to the pot using a ladle.
10. Pour the filtered medium in the silicone muffin pan. Allow 30-45 minutes for the medium to solidify before taking it out.
Notes:
* Any heated container can be used to cook your medium, as long as it has an adjustable temperature and it is large enough to hold the amount of medium you are preparing. Keep in mind that once you use an equipment for encaustic, you can’t use it anymore for food.
* If you don’t have a silicone mold, you can use an aluminum baking mold. Simply wait another 6-12 hours for the medium to shrink away from the edges of the mold. Then turn the mold over on a clean surface, give it a tap, and the medium should come right out. If you’re using a baking tray, you can cut the medium in squares using a butter knife when the medium has started to set but is still pliable.
VIDEO TUTORIAL
Note: This video is from my YouTube channel and makes references to the YouTube user interface screen.

I’d love to hear your thoughts. Email me your comments here.